
Equipment
- Raspberry Pi 2B
- SanDisk Ultra 16 GB microSDHC UHS-I Card
- Nooelec RTL-SDR Bundle v5 with 433 MHz antenna
- 5V 2.5A micro-USB Power Supply
Preface
This is part of my master plan to connect all things to Home Assistant. I have a few Pi’s laying around but most are the older 2B models. I have a couple of 3B but really would like to use them in situations where I need to connect via Wi-Fi. I ordered new SD cards because I didn’t want to deal with janky stuff I had laying around. The SDR is also new. Power supplies are readily available in my household, particularly since just about everything I now have is USB-C.
Here are the steps I went through and, when applicable, sites I referenced to save a lot of trial and error. Initial steps were completed on my Windows 10 laptop. Mac and Linux will obviously be different. This was a helpful tutorial.
- The last time I installed a new Raspberry Pi, I tracked down an image for Buster and burned it to the card using Win32DiskImager. It isn’t hard to use but the new Raspberry Pi Imager does a really nice job and lets you enable a few settings as part of the burn. First, install it from https://www.raspberrypi.com/software/. If you’re not sure what to pick, take the default. This one works on any model. If you have a 3 or newer, you could choose the 64 bit versions.
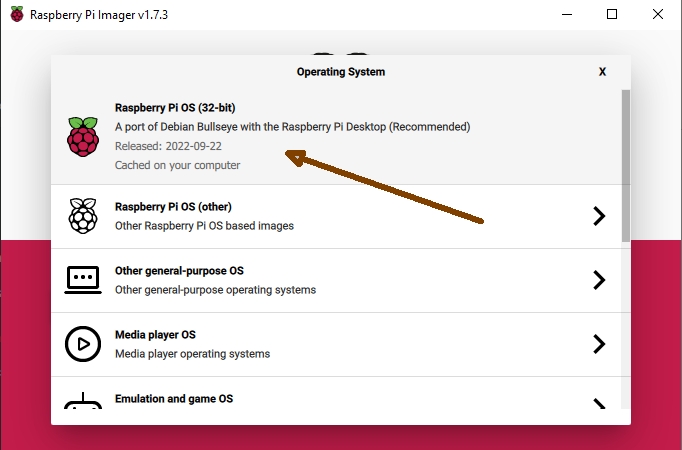
If you plan to run headless (no monitor, keyboard or mouse), you could also choose the minimal version and skip the overhead and bloat of the GUI environment. Since I’m sticking this into the corner of a closet and will primarily use SSH to manage the device, I chose the Raspberry Pi OS Lite (32 bit) option.
2. Once you’ve selected the OS version, you’ll see a small gear icon in the bottom right. Choose that. It will let you customize some details that will save some work later. The key settings you’ll want to choose, particularly if you’re running headless and need immediate remote access are to enable SSH, configure the Wi-Fi (if your Pi has it), and edit the login name and password. Default user names and passwords are stupid and should be avoided. If you’re so inclined, go ahead and set the host name and localization as well. Once everything is to your liking, you can opt to save the settings for future installations of use them just for this session.
3. Insert your SD-Card. If your computer doesn’t have a compatible slot, you can get a USB stick with a micro-SD slot and it’s completely plug and play. Then… Burn it! 🔥 Click the WRITE button. Go get a drink. This will take a few minutes. It will write and then verify the image. When it says it’s done, you can unmount or eject the disk. If you’re on Windows, it may annoyingly ask you to format the disk. DON’T DO IT!
So far, so good. I’ll be honest that even though I plan to run headless, I do like to boot up once with a monitor and input devices attached. It’s a bit more convenient when you’re changing settings. However you plan to proceed, you’ll need to plug the appropriate cables in, power it up, and login. If you didn’t change the login credentials, the default is pi/raspberry.
4. It’s time to do some housekeeping. Open up a terminal window. Type
sudo raspi-configsudo runs the command with full permissions (effectively root) raspi-config starts the menu configuration tool you’ll use to check and set a few important things.
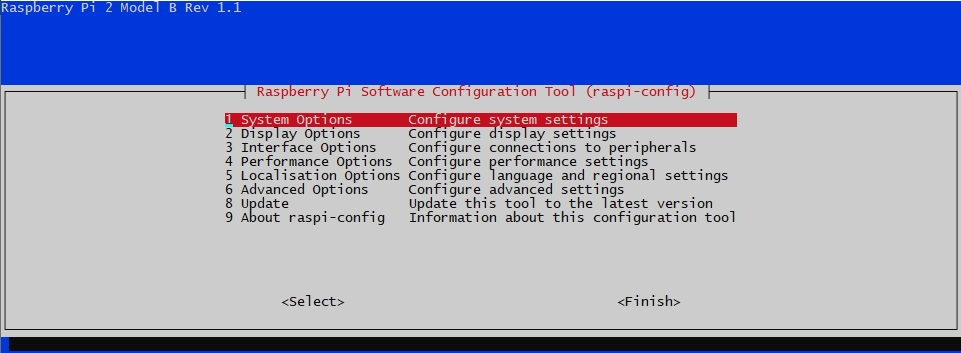
Here’s a rundown of things to consider editing:
1 System Options
S1 Wireless Options
S4 Hostname (especially if you’re running multiple Raspberry Pis on your network)
S5 Boot / Autologin. Boot to GUI or terminal
3 Interface Options
I2 SSH Make sure this is on if you want to grab a terminal remotely
5 Localisation Options. If you haven’t already changed this and you’re in the US, you will not be a fan of the UK keymapping.
6 Advanced Options
A1 Expand Filesystem. Important if you want to take full advantage of the SD-Card.
8 Update. Only works once you’re internet connected.
Once you’ve done this, it will probably want you to reboot. Do that. Next up is to update to the latest version of the OS. The following commands will get that done.
sudo apt-get update
sudo apt-get upgrade -y
sudo apt-get dist-upgrade -y
sudo apt-get autoremove
sudo apt-get autoclean
I like to tweak my prompt so I know where I am and what branch is active when I’m inside a git repository. I added this to my .bashrc file.
parse_git_branch() {
        git branch 2> /dev/null | sed -n -e 's/^\* \(.*\)/[\1]/p'
}

if [ "$color_prompt" = yes ]; then
        COLOR_DEF=$(tput setaf 7)
        COLOR_USR=$(tput setaf 3)
        COLOR_DIR=$(tput setaf 1)
        COLOR_GIT=$(tput setaf 6)
        NEWLINE=$'\n'
        export PS1='\[${COLOR_USR}\](\h) \[${COLOR_DIR}\]\w \[${COLOR_GIT}\]$(parse_git_branch)\[${COLOR_DEF}\]${NEWLIN>#    PS1='${debian_chroot:+($debian_chroot)}\[\033[01;32m\]\u@\h\[\033[00m\]:\[\033[01;34m\]\w \$\[\033[00m\] '
else
    PS1='${debian_chroot:+($debian_chroot)}\u@\h:\w\$ '
fi
You’ll have to restart the terminal for this to take effect. Now install some useful things that make your life easier and enable you to build from source. (from https://snapcraft.io/install/cmake/raspbian)
sudo apt install snapd
sudo reboot
sudo snap install core
sudo snap install cmake --classic
That’s it for getting your Raspberry Pi setup. For the next part, we’ll add the rtl-sdr and install the necessary software.